Thursday, 28 February 2013

Creating the light beam


To create my own light beam for the scene I followed the udn volumetric light beam tutorial which allowed me to create the exact effect I was after. I needed to change the colour of course to a blue to suit the original image but the effect I got was very good. 

Light beam material

Friday, 15 February 2013

Material and prop updates


When I began to import my updated meshes into UDK I decided that creating a tiled texture for my models would be the better option. I thought that by doing this I could have a stone material as a base texture and then overlay it with textures unique to the model. It was then that I found out I could set up material instances which would let me create one master material which could then have parameters set up that I could apply each individual texture to. Below is my master material that features a parameter that is ready to have unique normal maps, diffuse's and specular's applied to each instance of the master material.

Tiled stone master material
At the moment I am just using these instances to overlay the ambient occlusions of each model but I will later set up parameters that will allow me to vertex paint on top of the models.
I also needed to create some props to fill the floor. I needed to scatter things such as papers, weapons and skeletons to help give the appearance of ruin and randomised aftermath. Originally I tried to make piles of paper that I could scatter about but it looked unnatural and pre-placed. In the end I created individual paper pieces that shared one texture which I could then place around the level more freely.

Old paper pile material

Updated paper material for individual pieces

Scattered pieces of paper on the floor

I also created a couple of weapons which I scattered around the scene as well as some larger props such as the crates, an obelisk and stone blocks. I also created a tiled cobweb texture which I could apply to some meshes that I created to act as cobwebs.

Tiled cobweb material
These began to fill the floor a lot more but I also needed to create some skeletons for the corpses on the floor.
To do this I created one overall skeleton and then changed the skull and armour to form two variations. One variation was a standard dwarven soldier and then the other was meant to be Ori, the scribe who is resting against the tomb stone.

Armoured dwarf and Ori

Dwarf for the well and Ori against the tomb stone


Sunday, 10 February 2013

Grid and pivot mismatches


Whilst editing my geometry I had to alter a few models to all fit together properly on the grid in both UDK and maya. Previously I had worked to the grid only from the top down views. Building my first modular scene I had forgotten to build the geometry to the grid in the side and front views too. Most of these very easy fixes but in places I needed to place the pivot points slightly off to make sure that the geometry all fitted together properly within UDK. This issue I fortunately solved without too much hassle but for future projects I will certainly pay more attention to this issue when blocking out the level first time round to save myself time redoing things.

Pivot points placed on grid to fix issue

Friday, 8 February 2013

High poly modular work


After the planning presentation I began to focus on creating the modular aspects of the level. I started importing some of my models into Zbrush to work on the high poly meshes. I found a good set of custom brushes that allowed me to easily apply cracks and structural damages. I did at first use spotlight in Zbrush to texture the models but after a while became aware of inconsistencies in both the resolution of the quality and the scale. This happened from not always having the reference images to the same sizes whilst poly painting which easily happened between working on different files. I will focus on texturing these outside of Zbrush once I have some more of the high poly models completed. Below are some images of high poly models I created whilst working in Zbrush.


I also had some trouble compromising over the geometry of the low poly models. The single pillar for example was at first around 2500 tris which I was advised was quite high for a game mesh whereas a drastically reduced version was less than a hundred tris. The model however just couldn't display the detail I needed it to from the normal map so I ended up altering the geometry until it was 1902 tris which I was happy with since it would be close to my camera shots.

Original low poly at 2508 tris
Final low poly version 1902 tris


Saturday, 2 February 2013

Concept and Planning presentation

Next week is the first milestone for this project. Here we must present a concept and planning presentation of the scenes we have been working on.

So first, I needed to get my scene into UDK to render out a block out fly through video. I tried at first to quickly just import my scene grouped together but I was getting many issues both with lighting and for some reason my mesh was stretching too (which I am still yet to find out why). I ended up trying to do things properly and importing each piece in individually which in the long run was quite time consuming but I found that I had several issues with the face normals on a few of my models which I had to correct. Once all the pieces were imported into UDK I rebuilt my scene and placed a few lights within the environment. At the moment I have some lighting issues a few of my meshes. This I presume and expect is due to the fact that I have not fully UV'd and lightmapped my models which I will do when I begin texturing them. Some of these issues however were fixed after making sure the face normals of certain meshes were all the correct way.

Below is a screenshot of my block out within UDK.


Once I had set up a camera and a basic fly through of roughly how I wanted to show the environment I rendered the cinematic and then begun to put some slides together for the presentation. Below are the slides from my presentation and what I roughly said during each of them.


Over the first two slides I explained where the scene was from and why I had chosen to do it. I explained that I thought the scene had fantastic atmosphere and that combined with the lighting of the room and the way the props gave such incredible detail to the scene. Part of the criteria requires me to justify how this scene could work as a game level. I explained that it would play well as a small arena death match level, suitably in first person.


I went on to discuss the reference I have been using which has primarily been gathered from a high resolution copy of the movie that I have taken screenshots of key areas in the scene. Due to lack of reference that shows good set layouts of the scene, I explained that I had looked at reference from games that the scene is featured in, as well as models used for table top games.


During this slide I explained that much of my scene is built up of modular pieces which allow me to focus the majority of my time creating the props that will help bring the scene to life (despite the scene itself being rather lifeless). I then showed the fly through of my block out.


As the fly through of my block out played, I explained that as I begin to populate and add more detail to the scene, I will get a much clearer idea of how I want the final fly though to look.


I then went on to explain how I was planning to accomplish this week by week. I explained that I would try to populate my scene quickly and then try to get my lighting nailed down ready for the alpha presentation in week 8. I mentioned my key focuses being very important to try as these would be what is going to best represent the scene itself and add realism.


I then answered some questions about my presentation. The main question I was asked was about how comfortable I was creating the high poly models for my scene which I replied I was fairly confident in doing as I have been using Z-Brush much more frequently over the past few months and have really began to use it more in my work flow. I was told that lighting really must be a strong focus of mine in the scene as it really is key in nailing down the scene. This I will really try on as I really wish to try and do the movie scene justice by replicating it best I can. Other than that I was mainly given pointers and advice about how to do certain things such as create rubble and vertex paint inside UDK which will be very helpful further down the line.

Overall I think the presentation went quite well and my feedback was good. At this time I'm confident I can complete the scene to a standard I am happy with. My only concern is my own time management in doing so. This will really be something I need to make sure I do. 

Tuesday, 29 January 2013

More blocking out

I have pretty much got my scene blocked out now. I have all the main pieces where they need to be (scaled correctly too I believe). I have edited my geometry so that the modular pieces hold the detail they need to be recognised as part of the original scene. I have a few updates to make on the roof of the scene and the bridge arch's that hold the roof up but other than that the block out is complete. I am quite happy with the block out. I think the basic block out replicates the scene from the movie and I can now progress with sculpting, poly painting, texturing and modelling the props to fill the scene with.

Below are the screenshots of my block out as it stands now.


Over the course of the project, I have also created more modular pieces that I have been able to use for my scene. All the models in the screenshot below are used to build the scene on one side and then mirror over to the next. I hope to sculpt some variations of these models so that I can have the same modular pieces with noticeable differences so that the scene doesn't look to similar.


Below are a few screenshots of how I have assembled and edited the modular pieces. These should work well for sculpting on but I will have to greatly edit the geometry afterwards to obtain optimised low poly meshes.


Friday, 25 January 2013

Blocking out

Today I started blocking out my environment. So far it has proved very difficult. This is because I have not been able to get reference for certain parts of the environment. It has been very hard to try and get certain pillars and platforms to all fit together properly. Many of these issues that I have with the environment are not clearly seen in the scene so at the moment, I am having to guess how things need to be placed together best I can.

So far this is my block out progress,


This is a main screenshot of how the scene is coming together. As you can see the scene consists of many modular pieces that all fit together. Fortunately I am able to mirror my scene quickly and build the other half since it is very symmetrical. I will however have to take into account important aspects of the environment that have structural damages that break this symmetry. Currently it has proved difficult to make sure all of the pieces fit together properly. This is because I am trying to measure everything by eye. I have been very unlucky in finding strong enough reference that allow me to see the correct heights of certain parts of the scene. The main area that has proved awkward to replicate so far is the back pillars that bridge to the main walls next to the well. It seems that if I change the heigh of the walls to match my reference, then the bridge that leads to the pillars is too high which in turn means I have to raise the height of the platforms and stairs. This causes the rest of the scene to look too big. This is something that I need to focus on so that I am happy with the overall scale of the scene before pressing on too far into development.


These are the main modular pieces in my scene that I can duplicate and edit to build the environment. Currently these I believe are roughly the correct scale so once I get the rest of the scene pieces to match up with these assets, I can begin adding detail to them and progress.


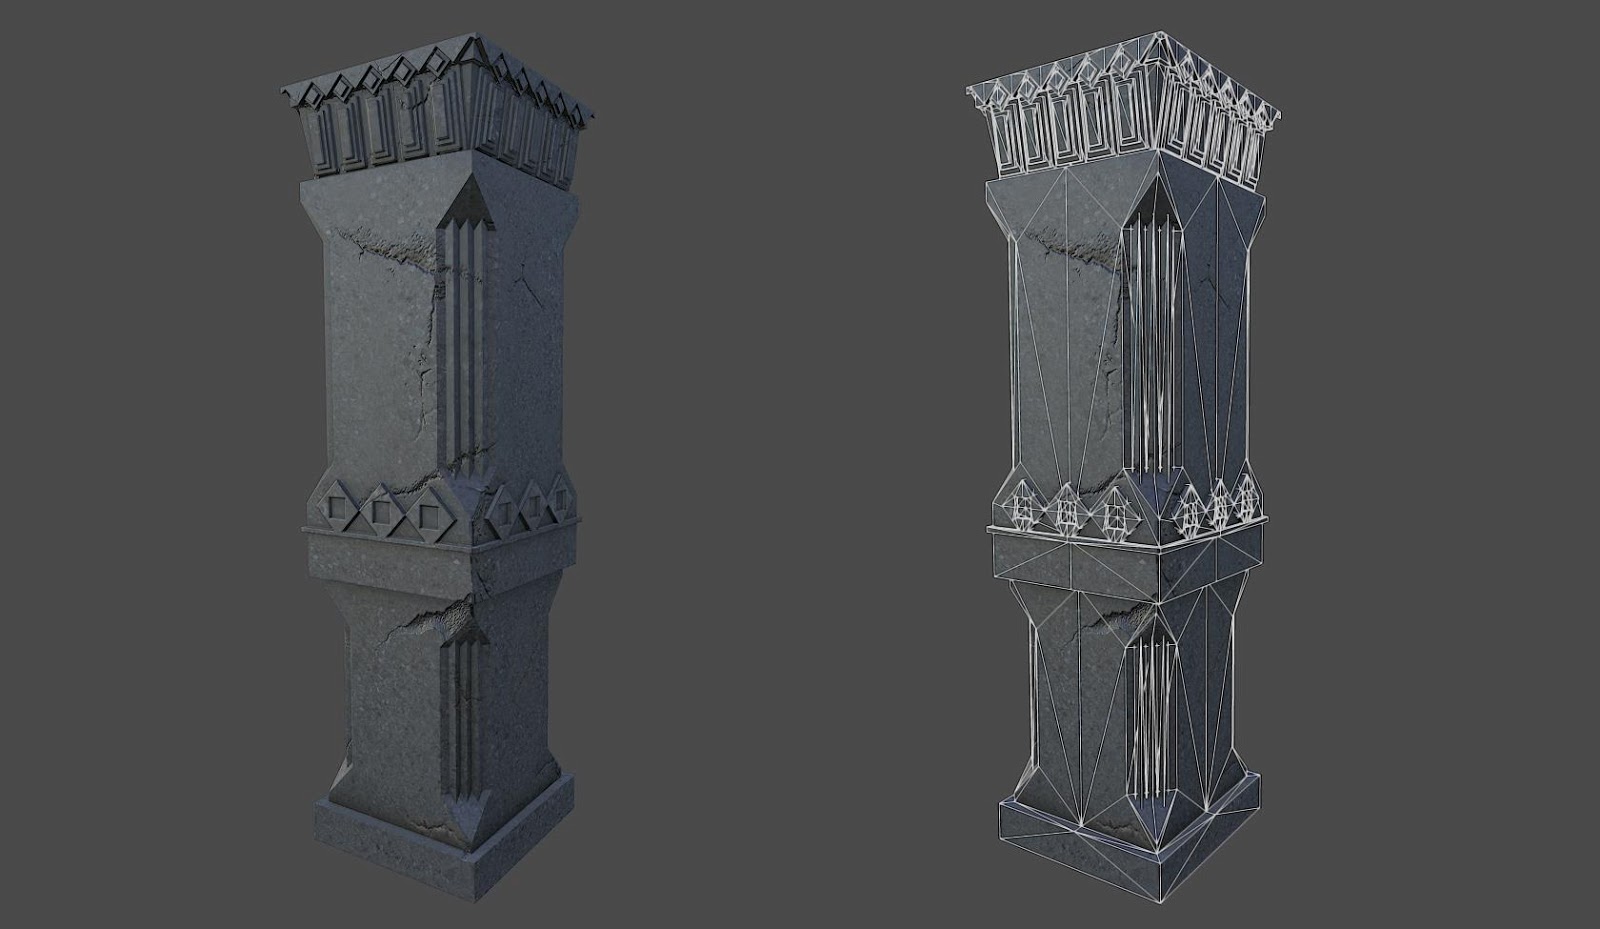
This is the well and the tomb stone that play key focal points in my scene. Once again, these need to be scaled perfectly to the rest of the scene so that everything looks correct.


This is a top down view of my scene so far. Like I previously mentioned, the scene has been mirrored over. This will save me a great amount of time in the long run since my scene is so modular. I will have the luxury of spending time focusing on creating assets and props to fill the scene.


Whilst working I like to constantly keep a back up of any pieces that I am working on, a mesh palette so to speak. Here I duplicate many variations of the same mesh that I have edited so that if the change doesn't work or a previous mesh was better optimised, then I have the backup at hand that I can get to very quickly as opposed to finding the save file that the mesh I need was in.